No-Bake Peanut Butter Cheesecake Balls Recipe
If there’s one dessert that brings together the creamy richness of cheesecake, the nutty indulgence of peanut butter, and the irresistible allure of chocolate, it’s these No-Bake Peanut Butter Cheesecake Balls. Imagine a luscious layer of smooth cream cheese filling, a gooey peanut butter core, all coated with glossy chocolate and sprinkled with crunchy peanuts. These little orbs of heaven are pure decadence in every bite — and the best part? You don’t even have to turn on your oven.
Whether you’re hosting a party, looking for a make-ahead dessert, or craving a midnight treat, this no-bake dessert is your ticket to instant indulgence. Let’s dive into the creamy, crunchy, chocolatey goodness of these bite-sized masterpieces.
Why You’ll Love This Recipe
These peanut butter cheesecake balls are everything dessert dreams are made of:
-
No baking required – Perfect for hot days or busy schedules.
-
Creamy and smooth texture – With the perfect balance between cheesecake and peanut butter.
-
Indulgent yet easy – They look gourmet but are surprisingly simple to make.
-
Make-ahead friendly – Store them in the fridge or freezer for future cravings.
-
Customizable – You can add different coatings or fillings to suit your taste.
These little delights are great for potlucks, holidays, or anytime you want to impress with minimal effort.
Ingredients
For the Cheesecake Base:
-
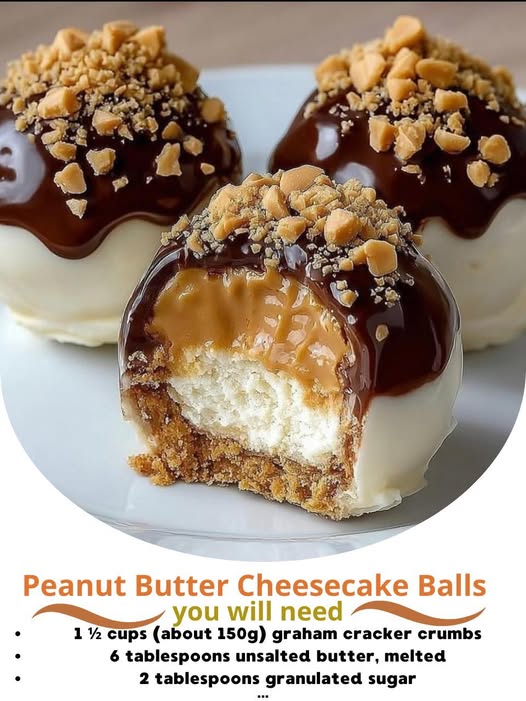
1 ½ cups (about 150g) graham cracker crumbs (or digestive biscuits, finely crushed)
-
6 tablespoons unsalted butter, melted
-
2 tablespoons granulated sugar
For the Cheesecake Filling:
-
8 oz (225g) cream cheese, softened to room temperature
-
¼ cup granulated sugar
-
½ teaspoon vanilla extract
-
⅓ cup heavy cream or whipping cream
For the Peanut Butter Core:
-
½ cup creamy peanut butter
-
2 tablespoons powdered sugar
-
A pinch of salt
For the Chocolate Coating:
-
1 cup semi-sweet chocolate chips or dark chocolate, chopped
-
1 tablespoon vegetable oil or coconut oil
For Garnish:
-
¼ cup chopped peanuts, toasted (optional)
-
A drizzle of melted peanut butter (optional)
Preparation Time
| Step | Time |
|---|---|
| Preparing crust & filling | 20 minutes |
| Assembling balls | 25 minutes |
| Chilling | 1 hour |
| Coating & decorating | 15 minutes |
| Total Time | ~2 hours (mostly chilling time) |
Step-by-Step Instructions
Step 1: Prepare the Base
-
In a medium bowl, combine graham cracker crumbs, sugar, and melted butter.
-
Mix until the crumbs are fully coated and resemble wet sand.
-
Press a small amount of this mixture into silicone molds or the bottom of mini muffin cups to form the base layer.
-
Place the molds in the refrigerator to firm up while you prepare the cheesecake filling.
Step 2: Make the Cheesecake Layer
-
In a large mixing bowl, beat the softened cream cheese and sugar until smooth and creamy.
-
Add vanilla extract and continue mixing until incorporated.
-
In a separate bowl, whip the heavy cream until soft peaks form.
-
Gently fold the whipped cream into the cream cheese mixture using a spatula — this gives the filling its light, airy texture.
-
Spoon the cheesecake mixture on top of the chilled crust in your molds, leaving a small cavity in the center for the peanut butter filling.
-
Return the molds to the fridge to chill while you prepare the filling.
Step 3: Prepare the Peanut Butter Filling
-
In a small bowl, mix peanut butter, powdered sugar, and a pinch of salt until smooth.
-
Roll the mixture into small balls, about the size of a marble.
-
Gently press one peanut butter ball into the center of each cheesecake mold.
-
Smooth the top with a spatula to ensure it’s evenly filled.
-
Chill the molds again for at least 30 minutes, or freeze them for quicker setting.
Step 4: Remove and Shape
-
Once fully set, carefully remove the cheesecake balls from the molds.
-
Place them on a parchment-lined tray and freeze them for about 15 minutes before coating — this helps the chocolate adhere better.
Step 5: Prepare the Chocolate Coating
-
Melt chocolate and oil together in a microwave-safe bowl in 30-second intervals, stirring between each until smooth.
-
Let it cool slightly so it thickens just a bit (but is still pourable).
-
Dip each chilled cheesecake ball into the melted chocolate or drizzle over the top for a beautiful coating.
-
Place them back on the tray and quickly sprinkle with chopped peanuts before the chocolate hardens.
Step 6: Chill and Serve
-
Chill the coated cheesecake balls in the refrigerator for at least 1 hour to fully set.
-
When ready to serve, remove them from the fridge and let them sit at room temperature for 5–10 minutes to soften slightly.
-
Serve on a plate with a drizzle of extra peanut butter or caramel sauce for a stunning presentation.
Texture and Flavor Breakdown
Every bite of these no-bake cheesecake balls delivers a perfect combination of textures and flavors:
-
Crunchy base from the graham cracker crust
-
Creamy cheesecake filling that melts in your mouth
-
Rich, gooey peanut butter center that adds depth and saltiness
-
Silky chocolate shell that brings a bittersweet balance
-
Crunchy peanut topping for the ultimate contrast
It’s a dessert symphony — creamy, sweet, nutty, and chocolatey all at once.
Tips for the Perfect Cheesecake Balls
-
Use high-quality cream cheese – Full-fat varieties give the best creamy texture.
-
Don’t skip chilling – Chilling between layers ensures clean separation and a stable structure.
-
Freeze before coating – This helps prevent the cheesecake from melting in the warm chocolate.
-
Use silicone molds – They make it easy to pop out the chilled cheesecake without breaking.
-
Experiment with coatings – Try white chocolate, milk chocolate, or even a caramel drizzle.
-
Add sea salt – A tiny sprinkle of flaky salt enhances the sweet and nutty flavors beautifully.
-
Customize the core – Swap peanut butter for Nutella, almond butter, or cookie butter for fun variations.
Flavor Variations
If you love to experiment, here are some creative twists:
-
Nutella Cheesecake Balls: Replace the peanut butter filling with Nutella and top with crushed hazelnuts.
-
White Chocolate Raspberry: Add a raspberry center and coat with white chocolate.
-
Salted Caramel Cheesecake Balls: Use caramel sauce for the core and sprinkle sea salt on top.
-
Cookies and Cream: Fold crushed Oreos into the cheesecake base and top with cookie crumbs.
-
Mocha Madness: Add a teaspoon of espresso powder to the chocolate coating for a coffee kick.
Storage and Make-Ahead Tips
These cheesecake balls are great for making ahead of time:
-
Refrigerator: Store in an airtight container for up to five days.
-
Freezer: Freeze for up to two months. Thaw in the fridge overnight before serving.
-
Serving tip: Always serve slightly chilled — they taste best when the chocolate coating is firm but the filling is creamy.
Serving Ideas
You can serve these in many fun and elegant ways:
-
On a dessert platter with strawberries, pretzels, and mini brownies.
-
As part of a sweet charcuterie board.
-
In cupcake liners for easy serving at parties.
-
Drizzled with extra melted peanut butter or caramel sauce.
-
Decorated with edible gold dust or chocolate shavings for a fancy touch.
Nutrition Information (Per Serving)
| Nutrient | Amount |
|---|---|
| Calories | ~260 kcal |
| Carbohydrates | 18g |
| Protein | 6g |
| Fat | 20g |
| Saturated Fat | 9g |
| Sugar | 12g |
| Sodium | 120mg |
(Values are approximate and may vary depending on specific brands and portion size.)
Fun Fact
The concept of no-bake cheesecakes dates back to the early 20th century when refrigeration became common in homes. Instead of baking a traditional cheesecake, people began experimenting with chilled versions that used gelatin or whipped cream for structure. Fast forward to today, and we’ve transformed this simple idea into modern dessert art — like these peanut butter cheesecake balls that require no heat, no fuss, and still deliver maximum flavor.
Troubleshooting and FAQs
Q1: My cheesecake filling is too runny — what can I do?
A: Make sure your cream cheese is fully softened but not melted. Also, fold in the whipped cream gently so it doesn’t deflate. If it’s still too soft, refrigerate it longer before shaping.
Q2: Can I make these vegan or dairy-free?
A: Yes! Use vegan cream cheese, coconut cream instead of heavy cream, dairy-free butter, and plant-based chocolate.
Q3: Can I skip the crust layer?
A: Absolutely. The crust adds texture, but the balls hold up fine without it. Just shape them directly with the filling and peanut butter.
Q4: Can I double the batch?
A: Definitely — this recipe scales up easily. Just use a larger bowl for mixing and more molds or trays for setting.
Q5: How can I make them look extra glossy?
A: Tempering the chocolate or adding a touch of coconut oil helps achieve that professional, shiny finish.
The Ultimate Dessert Experience
When you bite into one of these No-Bake Peanut Butter Cheesecake Balls, it’s more than just dessert — it’s an experience. The cool, creamy center, the surprise of smooth peanut butter, and the luxurious chocolate coating create a perfect trifecta of flavors. They’re elegant enough for special occasions yet easy enough for everyday indulgence.
Whether you serve them as bite-sized party desserts, holiday treats, or a quick indulgence after dinner, these cheesecake balls are guaranteed to impress every peanut butter and chocolate lover around.
Summary
-
Prep time: ~2 hours (including chilling)
-
Servings: 12–15 cheesecake balls
-
Calories per serving: ~260 kcal
-
Skill level: Easy
-
Storage: 5 days refrigerated or 2 months frozen