
No-Bake Christmas Mini Cheesecakes
Every Christmas, I love bringing out a few tried-and-true recipes that never fail to spark joy, and these No-Bake Christmas Mini Cheesecakes are always a hit. I first made them during a snowy December afternoon with my kids, and decorating them with sprinkles and crushed candy canes became an instant holiday tradition.
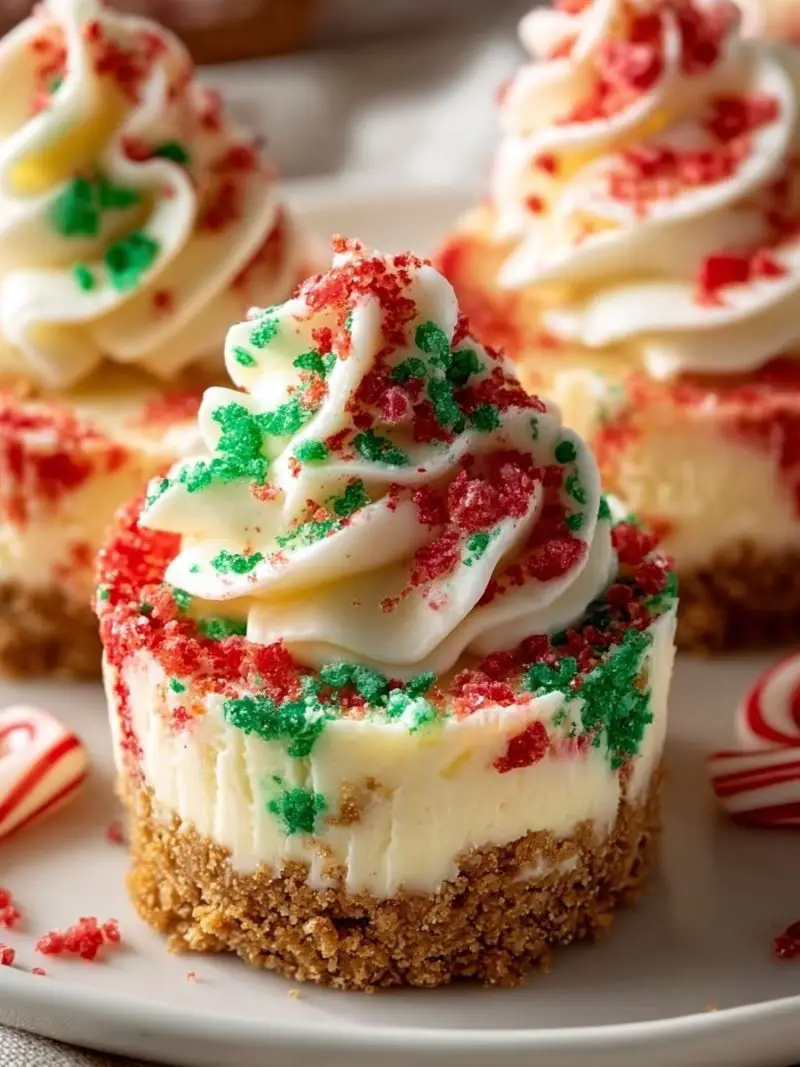
These festive little treats are perfect for holiday parties, cookie exchanges, or a sweet finish to Christmas dinner. They’re incredibly easy to make—no oven required—and look absolutely adorable on any dessert table. Whether you’re hosting a gathering or making treats for Santa, these no-bake mini cheesecakes bring all the merry magic.
Why You’ll Love No-Bake Christmas Mini Cheesecakes
-
- No oven needed – Perfect when the oven is already full of roasts and cookies.
- Festive and fun – Red and green sprinkles add cheerful holiday vibes.
- Kid-friendly – Safe and simple enough for little hands to help.
- Make-ahead friendly – These need time to chill, so they’re ideal for preparing the night before.
- Individual portions – Great for serving at parties or gifting to neighbors.
- Light and creamy – The whipped filling has a mousse-like texture that’s absolutely dreamy.
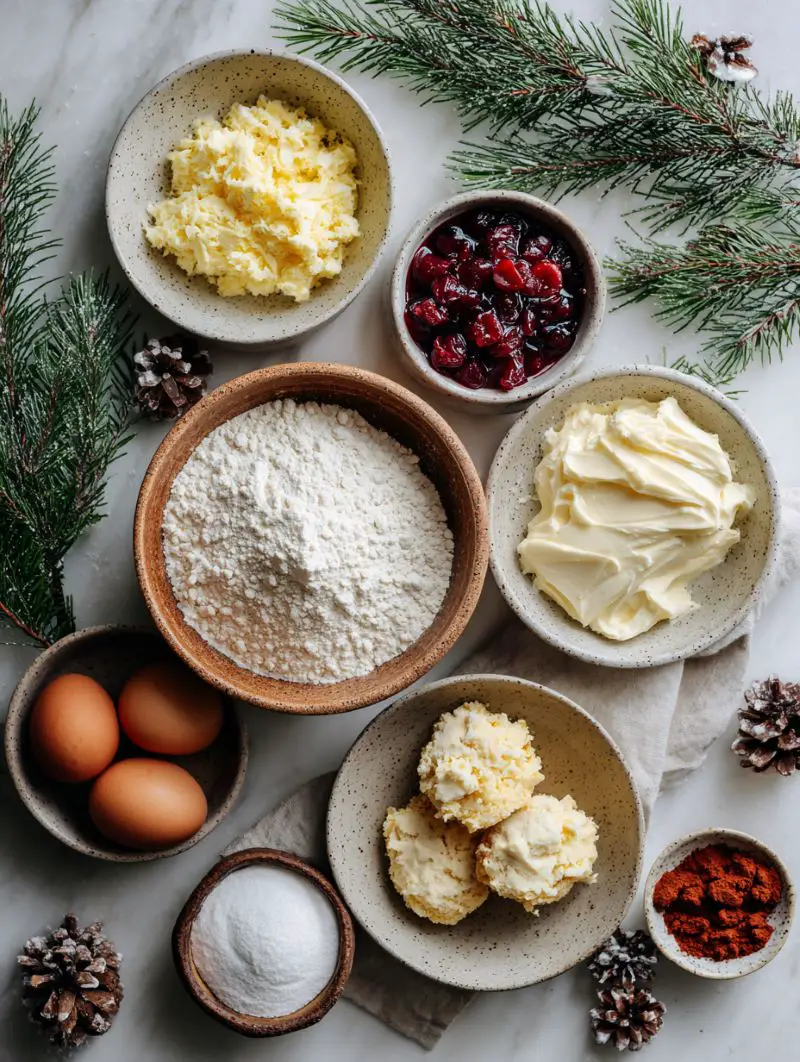
Ingredients You’ll Need
-
- 1 ½ cups graham cracker crumbs – You can also use digestive biscuits.
- 6 tablespoon melted butter – Unsalted is best, but salted works in a pinch.
- 2 tablespoon granulated sugar – Adds just a touch of sweetness to the crust.
- 8 oz (225g) cream cheese, softened – Let it sit at room temperature for easier mixing.
- 1 cup powdered sugar – For a smooth, sweet filling.
- 1 cup cold heavy cream – Be sure it’s very cold for proper whipping.
- 1 teaspoon vanilla extract – Adds a cozy, comforting flavor.
- Red and green sprinkles – For that essential Christmas touch.
- Optional: Crushed candy canes – Adds festive flair and a peppermint crunch.
Step-by-Step Instructions
- Prepare the crust:
-
- In a medium bowl, combine the graham cracker crumbs, melted butter, and granulated sugar.
- Mix until the crumbs are evenly coated and resemble wet sand.
-
- Form the crust base:
- Press about 2 tablespoons of the crumb mixture into each mini cheesecake mold or cupcake liner.
- Use the back of a spoon to press down firmly and evenly.
- Chill in the refrigerator while you make the filling.
- Make the cream cheese filling:
-
- In a large mixing bowl, beat the softened cream cheese with an electric mixer until smooth and fluffy.
- Gradually add in the powdered sugar, continuing to beat until fully combined and creamy.
-
- Whip the cream:
- In a separate chilled bowl, beat the cold heavy cream and vanilla extract until stiff peaks form.
- This takes a few minutes, so be patient—you want the cream to hold its shape.
- Combine the mixtures:
-
- Gently fold the whipped cream into the cream cheese mixture.
- Use a spatula and light motions to keep the filling airy and smooth.
-
- Fill the molds:
- Spoon or pipe the filling over each prepared crust.
- Smooth the tops with a spatula or back of a spoon.
- Chill and set:
-
- Refrigerate the cheesecakes for at least 4 hours, or overnight if possible.
- This helps them firm up and develop their creamy texture.
-
- Decorate and serve:
- Just before serving, top each mini cheesecake with festive red and green sprinkles.
- For extra sparkle and a peppermint twist, add crushed candy canes.
Serving and Storage Tips
These no-bake mini cheesecakes are best served chilled. Arrange them on a holiday platter or cupcake stand and serve as a delightful end to your Christmas feast.
-
- Fridge storage: Keep in an airtight container in the refrigerator for up to 5 days.
- Freezer friendly: Freeze individually wrapped cheesecakes in a container for up to 2 months. Thaw in the fridge overnight.
- Reheating: No reheating needed—just serve straight from the fridge.
Helpful Notes
- Use full-fat cream cheese for the richest, creamiest texture.
- Don’t overmix when folding in the whipped cream; it helps keep the filling light.
- Mini cupcake liners make cleanup easy and add a festive touch.
- Add-ins: Swirl in some melted white chocolate or top with mini chocolate chips for variety.
- Dairy-free option: Use plant-based cream cheese and whipped topping substitutes.
Frequently Asked Questions
- Can I freeze these No-Bake Christmas Mini Cheesecakes? Yes! Wrap them individually and store in an airtight container in the freezer for up to 2 months. Thaw in the refrigerator before serving.
- What if I don’t have graham crackers? You can use crushed digestive biscuits, vanilla wafers, or even gingerbread cookies for a more festive flavor.
- How long do these need to chill? At least 4 hours, but overnight chilling is best for firm texture and flavor development.
- Can I make these in a large pan instead of minis? Absolutely. Use an 8×8” pan lined with parchment paper, press in the crust, add the filling, and chill as usual. Slice into squares before serving.
- How do I know when the whipped cream is ready? Look for stiff peaks that hold their shape when you lift the beaters—it should be fluffy and stable.
Final Thoughts
These No-Bake Christmas Mini Cheesecakes have become a holiday staple in our home. They’re simple enough for a weeknight treat but special enough to impress guests. I’ve tested this recipe countless times, and it always brings a smile to everyone’s face. If you try it, I’d love to hear how it turned out!