Strawberry Banana Pudding Dream Recipe A Creamy, Fruity, No-Bake Dessert that Tastes Like a Slice of Heaven
If you could take the comfort of banana pudding, the freshness of ripe strawberries, and the richness of a creamy no-bake dessert — and layer them all together — you’d have the ultimate indulgence: Strawberry Banana Pudding Dream.
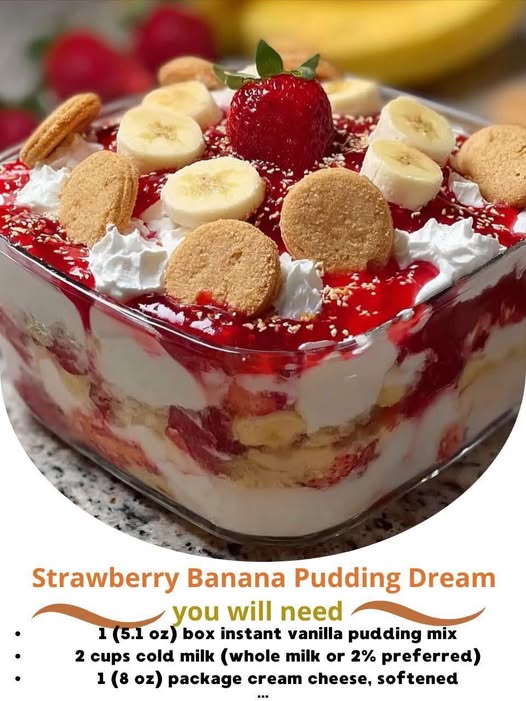
This luscious dessert combines layers of creamy vanilla pudding, fluffy whipped topping, ripe bananas, juicy strawberries, and a buttery vanilla wafer crust. It’s light yet rich, nostalgic yet refreshing — the perfect crowd-pleaser for any occasion. Whether you’re making it for summer gatherings, Sunday dinner, or a potluck, this dessert never fails to impress.
Let’s explore how to make this dreamy dessert step by step.
Preparation Overview
| Step | Time |
|---|---|
| Prep Time | 25 minutes |
| Chill Time | 4 hours (minimum) |
| Total Time | About 4½ hours |
| Servings | 10–12 |
| Difficulty | Easy / No-Bake |
Ingredients
You’ll need simple, classic ingredients — many of which you may already have in your kitchen.
For the Crust:
-
2 cups crushed vanilla wafers (about 60 wafers)
-
6 tablespoons unsalted butter, melted
-
1 tablespoon granulated sugar (optional, for extra sweetness)
For the Filling:
-
1 (5.1 oz) box instant vanilla pudding mix
-
2 cups cold milk (whole milk or 2% preferred)
-
1 (8 oz) package cream cheese, softened
-
1 cup sweetened condensed milk
-
1 teaspoon pure vanilla extract
-
1 (8 oz) container whipped topping (like Cool Whip), thawed
For the Layers:
-
3 large ripe bananas, sliced
-
2 cups fresh strawberries, sliced
-
Extra whipped topping for finishing (optional)
For Garnish (optional but recommended):
-
Crushed vanilla wafers
-
Fresh strawberry slices
-
Banana coins (added just before serving to prevent browning)
-
Mint leaves for a touch of color
Equipment Needed
-
9×13-inch baking dish or deep trifle bowl
-
Electric mixer or whisk
-
Mixing bowls
-
Spatula
-
Measuring cups and spoons
-
Refrigerator space for chilling
Step-by-Step Preparation
Step 1: Prepare the Crust
-
Place the vanilla wafers in a food processor and pulse until fine crumbs form.
(If you don’t have a processor, put the wafers in a zip-top bag and crush them with a rolling pin.)Groceries -
In a bowl, mix the crumbs with melted butter (and sugar if using) until well combined.
-
Press the mixture evenly into the bottom of your 9×13-inch dish.
-
Place the crust in the fridge to firm up while you prepare the filling.
Tip: Don’t press the crust too firmly or it may become dense. You want it just compact enough to hold together.
Step 2: Make the Pudding Layer
-
In a large mixing bowl, whisk together the instant vanilla pudding mix and cold milk until smooth and thickened (about 2 minutes).
-
Set aside in the refrigerator to chill slightly while preparing the cream cheese mixture.
Step 3: Create the Cream Cheese Mixture
-
In another large bowl, beat softened cream cheese with an electric mixer until creamy and lump-free.
-
Add the sweetened condensed milk and vanilla extract, beating until fully combined and smooth.
-
Fold in the prepared pudding mixture.
-
Gently fold in the whipped topping (Cool Whip) until everything is evenly incorporated and fluffy.
You now have the dreamy, velvety filling that ties everything together.
Step 4: Assemble the Layers
Now comes the fun (and most satisfying) part — layering your Strawberry Banana Pudding Dream.
-
Layer 1 (Crust): Start with your chilled vanilla wafer crust.
-
Layer 2 (Bananas): Arrange banana slices evenly across the crust.
-
Layer 3 (Cream): Spread half of your creamy pudding mixture over the bananas.
-
Layer 4 (Strawberries): Add a generous layer of fresh strawberry slices.
-
Layer 5 (Remaining Cream): Spread the remaining pudding mixture evenly over the strawberries.
Smooth the top gently with a spatula to create a beautiful, even finish.
Step 5: Chill
Cover the dish with plastic wrap and refrigerate for at least 4 hours — ideally overnight.
This step allows the flavors to meld together and the dessert to set into its creamy, sliceable texture.
Tip: The longer it chills, the better it tastes. Overnight chilling results in the best flavor and consistency.
Step 6: Garnish and Serve
Before serving, top the dessert with:
-
A final layer of whipped topping
-
Crushed vanilla wafers for crunch
-
Fresh strawberry slices and banana coins for decoration
-
A few mint leaves for a fresh, elegant finish
Slice into squares or spoon into bowls and serve chilled.
Pro Tips for the Perfect Strawberry Banana Pudding Dream
-
Use Ripe (but Firm) Bananas
Overripe bananas can become mushy and overpowering. Choose bananas with bright yellow peels and minimal brown spots. -
Keep Strawberries Dry
After washing, pat strawberries completely dry. Excess moisture can make your layers watery. -
Whip for Airiness
Fold your whipped topping gently to keep the mixture fluffy — overmixing can deflate it. -
Chill Thoroughly
A full 4-hour chill ensures clean layers and a stable, sliceable dessert. -
Prevent Banana Browning
If prepping early, lightly brush banana slices with lemon juice before layering. -
Try Homemade Pudding
If you want to elevate the flavor even more, use homemade vanilla pudding instead of instant — just make sure it’s completely cooled before mixing.
Flavor Variations and Creative Twists
This dessert is easily adaptable. Try one of these variations to make it your own:
1. Chocolate Strawberry Banana Dream
Swap vanilla pudding for chocolate pudding and drizzle chocolate syrup between layers.
2. Cheesecake-Style Layer
Add ½ cup of sour cream to the cream cheese mixture for a slight tang reminiscent of cheesecake.
3. Coconut Bliss
Add ½ cup shredded coconut to the pudding mixture and sprinkle toasted coconut on top.
4. Berry Medley Version
Use mixed berries (strawberries, blueberries, raspberries) for a colorful twist.
5. Graham Cracker Crust
Substitute vanilla wafers with crushed graham crackers or Biscoff cookies for a different flavor base.
Storage and Make-Ahead Instructions
-
Refrigerator: Store covered for up to 3 days. The bananas will slightly darken after the second day, but the flavor remains delicious.
-
Freezer: You can freeze portions for up to 1 month. Thaw overnight in the fridge before serving.
-
Make-Ahead: Assemble the dessert (except the fresh fruit topping) a day ahead. Add fruit garnish right before serving for the best presentation.
Nutritional Information
Serving Size: 1 slice (1/12 of recipe)
| Nutrient | Amount |
|---|---|
| Calories | 340 kcal |
| Fat | 15 g |
| Saturated Fat | 9 g |
| Cholesterol | 45 mg |
| Sodium | 210 mg |
| Carbohydrates | 47 g |
| Sugar | 32 g |
| Protein | 4 g |
| Fiber | 1 g |
Note: Nutritional values may vary based on specific ingredient brands and portion size.
Serving Suggestions
-
Family Gatherings: Serve this as the centerpiece of your dessert table — it’s light, fruity, and universally loved.
-
Summer Parties: Perfect chilled dessert for barbecues, picnics, or poolside snacks.
-
Layered Trifle Version: Assemble in a clear trifle bowl for an eye-catching, elegant presentation.
-
Mini Versions: Make individual servings in small mason jars or dessert cups — perfect for parties.
-
Breakfast Treat: (We won’t tell!) A small slice pairs wonderfully with morning coffee or tea.
Troubleshooting Common Issues
1. My pudding layer is too runny!
→ Be sure to use instant pudding and cold milk. If using non-instant pudding, it must be cooked and cooled first.
2. My dessert is too sweet.
→ Reduce the amount of sweetened condensed milk slightly or use unsweetened whipped cream.
3. The bananas turned brown.
→ Brush them with a little lemon juice before layering to slow oxidation.
4. Crust is soggy.
→ Let the crust chill at least 30 minutes before layering to keep it firm and crisp.
5. Pudding mixture has lumps.
→ Ensure cream cheese is fully softened before mixing; cold cream cheese can create lumps.
Why You’ll Love This Dessert
No baking required – Quick and stress-free.
Crowd-pleaser – Everyone loves the banana-strawberry combo.
Customizable – Easily adapted for any flavor or occasion.
Make-ahead friendly – Tastes even better after chilling overnight.
Visually stunning – Those layers of fruit and cream look gorgeous on any table.
Final Thoughts
The Strawberry Banana Pudding Dream is everything its name promises — light, luscious, and full of flavor. It combines the freshness of fruit, the nostalgia of banana pudding, and the elegance of a layered trifle into one irresistible dessert. Every spoonful gives you a perfect balance of sweet, creamy, and fruity goodness.
This recipe is proof that simple ingredients can create something extraordinary. With no baking required and minimal prep, it’s a perfect choice for both beginners and experienced dessert lovers. Whether served at a holiday dinner or summer picnic, it’s guaranteed to draw compliments and requests for seconds.
So grab your mixing bowl, slice up those strawberries and bananas, and prepare to fall in love with the dessert that truly lives up to its name — your very own Strawberry Banana Pudding Dream.